Tiers of the Cake


A tasty slice of inspiration...

Hello foodies,

A huge warm welcome to Red Velvet Baking, the blog! I have been baking since I can remember and I have always wanted to share my experiences and tasty flair beyond the walls of my own home. In summer 2011 I launched this little blog. I blog as a celebration of my achievements and dedication to my culinary passion, alongside an overflow of my enthusiasm, with a few added delicious recipe ideas. Pictures and tips galore, sure enough to sink your teeth right into and to get your mouth watering. Delicious beautiful baking can put a smile on anyones face.

Summer 2013 saw me train for a month at Leiths, gaining a distinction in practical cookery and last summer I ran a culinary arts course in the USA, specialising in baking.

I am now back in the UK, writing for my blog from sunny Yorkshire. 2015 is going to be a big year for Red Velvet Baking, so keep posted!

Keep calm, enjoy and most importantly BAKE!


Jessica

xox

Twitter @RedVelvetBaking
Instagram @RedVelvetBaking
Pinterest Red Velvet Baking
Facebook Red Velvet Baking
Website - Undergoing a magical makeover!

Find the missing sprinkle...

Showing posts with label chocolate. Show all posts

Tuesday, 12 May 2015

Eat: Double Chocolate Roulade

Hey foodies, 

With summer on its way, desserts are getting lighter. I have plenty of space for warm, sticky puddings with lashings of custard, in my heart, but on bright summer evenings, sometimes a lighter, cold dessert best fits the occasion.

This is one of my ultimate favourite desserts. I've been making variations on this recipe for years. It's quick and easy, but looks professional and it is even coeliac friendly!

I always get asked to describe a what a roulade is like and 9 times out of 10 I just say eat some! I put roulades on a scale between swiss roll and meringue. It's like a super light swiss roll, as it contains no flour, but also like a soft meringue with a slightly firm outer shell. The fact of the matter is you have to try it and after one mouthful, I'm sure you'll be hooked!

Ingredients

200g (7oz) plain chocolate (54% cocoa solids plus preferably), broken into pieces
150g (5oz) golden caster sugar
5 medium eggs, separated
1tsp vanilla escence
2-3tbsp icing sugar, sifted
100g (4oz) white chocolate, broken into pieces
284ml (10floz) double cream
150g (5oz) raspberries or blackberries for decoration
Extras may include white or dark chocolate curls, icing sugar for dusting etc.

Method

1. Heat a fan assisted oven to 180°C (350°F, gas mark 4). Melt the plain chocolate in a bain marie (bowl over a pan of simmering water). In a separate bow whisk the sugar and egg yolks for around 4 minutes, until pale and thick, before folding in the melted chocolate.

2. In another separate bowl, whisk the egg whites until stiff. Then, carefully beat 2tbsp of the egg whites into the chocolate mixture. Proceed by gently folding in the remainder egg whites, being careful not to overwork the mixture.

3. Line a swiss roll tine (33 x 23 cm/ 13 x 9in). Pour the mixture onto the parchment and bake in the oven for 15 - 20 minutes, until risen and firm to the touch.

4. Whilst the meringue roulade is baking, melt the white chocolate in a bain marie and leave to cool for 5 minutes. Then, whisk the cream until forming soft peaks.

5. When the roulade is ready to be taken out of the oven, prepare a large sheet of greaseproof paper sprinkled with icing sugar, for the roulade to be turned out onto. Once turned out, cover with a clean damp tea towel and allow to cool.

6. Return to the cream and white chocolate and combine. Sometimes you may need to rewhip the cream slightly to keep the stiff texture.

7. Once the roulade has cooled, remove the tea towel and smoother with the white chocolate cream. Some people like to add some raspberries/blackberries at this stage to the filling of the roulade, however it is just as delicious to use them more for decoration.

8. Using the greaseproof paper as a guideline, roll the roulade from one long end to the other. Between rolls use the greaseproof to tuck the roulade right under itself, shaping a neat roll and don't worry if it cracks, this is a rustic dessert after all! Once rolled, roll up in the greaseproof and tighten the ends, before chilling. This will keep it in perfect shape ready for serving.


Variations

White Chocolate & Raspberry
Replace the dark chocolate with white chocolate and use 250ml creme freche and a punnet of crushed raspberries for the filling, for a slightly lighter delight!!


Black Forest Roulade
Make the chocolate roulade as above. Once cooled drizzle two tbsp of Chambord (raspberry liqueur) or Kirsch (cherry liqueur) over the roulade. Use double cream, whipped like before but scatter 100g of chopped morello cherries over the cream before rolling. Decorate with morello cherries and dark chocolate curls.

Share your baking adventures with us on Instagram, Twitter and Pinterest @RedVelvetBaking.

Say it with roulade this summer.

Love & warm wishes,

Jess xo

Saturday, 14 March 2015

Eat: Easter Treats with Aldi

Hey foodies,


This week I received a gorgeous hamper of goodies from Aldi. To put the goodies to the test, I picked up some Easter treats, also from Aldi, and got my bake on!


In the hamper I received some cute oven gloves, conveniently red(!), a handy cske carrier, a silicone cake mould, a set of scales and an electric measuring jug.


Oven gloves

How exciting that they sent me red oven gloves - they must've known! These cute little gloves are double handed and will add a splash of colour to any kitchen. I'm sure to look stylish, whilst NOT burning my arms getting cakes out of the oven.


Weighing scales


Super handy and super slick. These touch interface, weighing scales are great for getting those all important accurate measurements when baking.

Measuring jug


I've always wanted one of these. A weighing scale based jug makes sure all you liquid measurements are accurate. With a simple, button display on the handle, this is really easy to use and makes measuring ingredients quick and easy.

Carry case


As you can see I took my best budget bake to work. This carry case is ridiculously cheap at £4.99 and is great for transporting your delicious bakes around. You could even carry your cupcakes in here, but make sure you keep it level to avoid splattered buttercream!


With Easter just weeks away, Aldi was full of chocolate Easter egg hunting sets, mini rabbit shapes and, for the grown ups, some hazelnut and chocokate eggs! I just had to get some and I may have eaten one or two before even starting to bake! 

Aldi have a great selection of special buys around Easter, to inspire you to get in the kitchen and get baking. Make sure you pop down to your local Aldi and pick up some Easter goodies, check out the recipes below for some seasonal bakes!


Chocolate and Hazelnut Loaf

For my Aldi best budget bake I made this chocolate and hazelnut loaf cake and some cupcakes with a little leftover batter. This a really simple recipe, so get the kids involved and have a bit of fun. 

Ingredients

For the cake
80g butter (89p for 250g at Aldi)
280g caster sugar (89p for 1kg at Aldi)
215g plain flour (45p for 1.5kg at Aldi)
40g cocoa powder
1tbsp baking powder (69p for 200g at Aldi)
245ml milk
2 large eggs (£1 for 10 large eggs at Aldi)
1tsp vanilla extract

For the icing

115g butter (89p for 250g at Aldi)
65ml milk
1tsp vanilla extract
400g icing sugar (69p for 500g at Aldi)
50g cocoa powder
Orange and green food colouring

For the decoration

2tbsp Hazelnut spread (£1.78 for 400g at Aldi)
Aldi mini eggs (59p per pack at Aldi)
Aldi mini bunny rabbits (69p at Aldi)
Aldi hazelnut cream eggs (£1.69 at Aldi)

Method

Pre-heat the oven to 175 (fan assisted). Line a loaf tin and put 6 cupcake wrappers in a muffin tray.

1. Make sure the butter is at room temperature and then, in a large bowl, cream it with the sugar. You can use an electric hand mixer, but start with a fork to avoid a sugar coated kitchen! This may look a little like wet sand when it's done. If you have a mixer, use the paddle attachment and watch it work it's magic!

2. Add the flour and baking powder and blend it in with a fork. This will look a little like breadrcumbs. Once at this stage, slowly add the cocoa powder - it creates cocoa clouds if you're not too careful! If using a stand mixer, just add it all in and put it on a low setting or you'll get clouds too!
3. Lightly beat the eggs with the milk and vanilla. With the electric whisk on the slowest speed, gradually pour the liquid into the dry mixture, until it is all incorporate. Don't whisk for too long at this stage, as it can make the batter a little stiff.
4. If you have one, use a cookie or ice cream scoop to put one dollop of mixture into each cupcake case. Use the remainder to fill the loaf tin ¾ full and pop both into the oven.

5. The cupcakes will take about 20 minutes and should bounce back when touched. Take them out quickly, as the cake will need around 25-30 minutes. Before taking the cake out, test to see if it is ready by pressing gently on the centre of the cake and seeing if it bounces back. If it is not ready, test in 3 minute increments.

6. Once the cupcakes are out, unwrap 6 hazelnut cream eggs and push one into the centre of each cupcake. 

Let the the cake cool for a short while in the tin and then run a knife around the edge to loosen it and remove it from the tin. Leave both to cool on a wire wrack, before moving onto the icing.

Chocolate Frosting


1. Cream the butter with an electric whisk or in a stand mixer, until soft and fluffy.

2. Gradually beat in a little milk, vanilla extract and 200g of the icing sugar. Keep beating on a steady slow speed until the icing sugar is incorporated and then gradually add a bit of each until it is all in!

3. In two separate bowls, take a scoop of the vanilla frosting and put to one side. This will be used for the carrots tops and leaves. Take a third scoop and place directly in a piping bag, fitted with a small star nozzle.

4. Back with the icing mixture, add the cocoa powder and slowly beat in. Feel free to have a cheeky taste test at this stage, with a clean spoon of course. If it is not chocolatey enough, add some more cocoa powder. If the frosting is looking a little too stiff, add a tiny drop of milk. Remember that liquid goes a long way in frosting, so make sure it really is a tiny drop!

5. Put the chocolate frosting into a piping bag fitted with a big star nozzle. If you don't have one, use a spatula to coat the sides of the cake.

6. Back to the separate bowls, drop a tiny bit of green gel food colour in one and orange gel food colouring in the other. Whisk in until the frosting is even in colour and place the green in a piping back with a leaf nozzle (no nozzle would be ok for leaves as you can just drag a piped dot into a leaf shape) and put the orange into a piping bag with no nozzle.

Cake Assembly


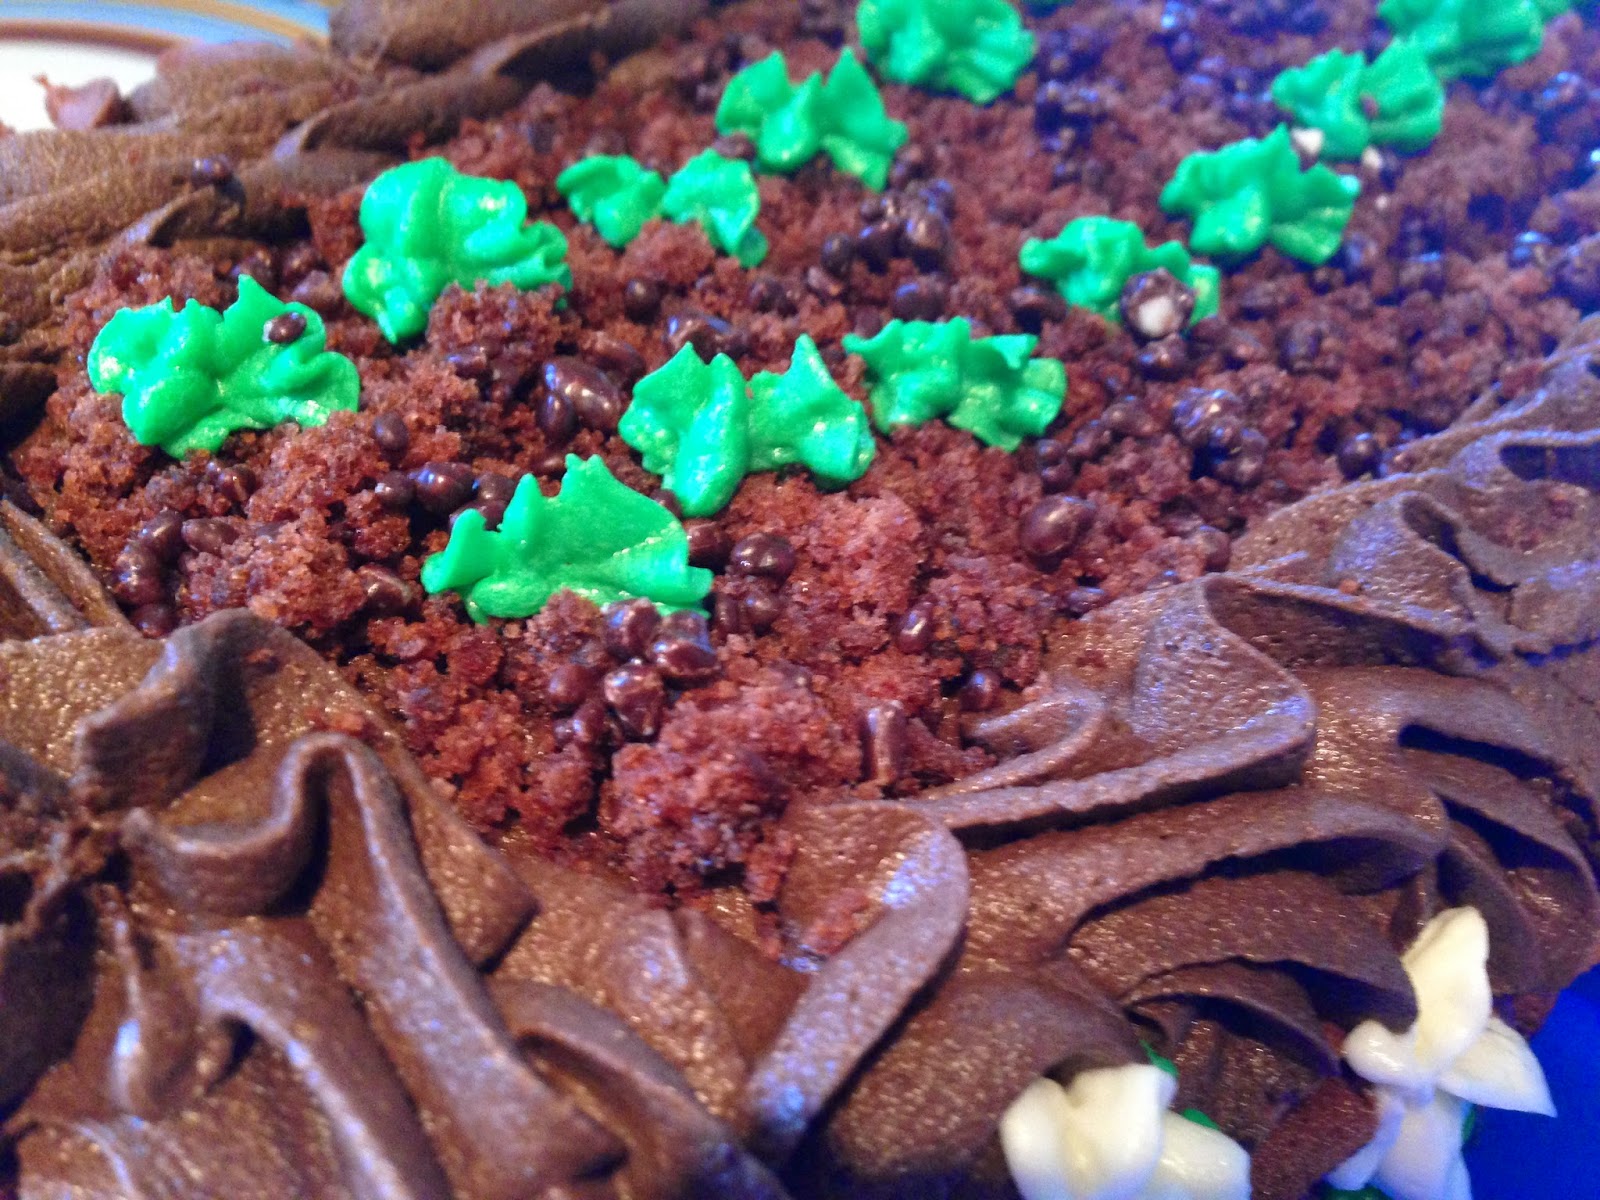
1. Once the cake is cooled, cut the top off the cake to level it. Put this excess cake into a bowl and crumble into pieces to create your flower bed 'soil'.
2. Pipe the chocolate frosting in swirls around the edges of the cake or use a spatula to coat the sides, leaving the top bare.
3.Coat the top with hazelnut spread and sprinkle on the cake soil.
4. Now to get super creative! Pipe on some white flowers, use the orange buttercream to create little round carrot tops and pipe green leaves on the top. Get your mini eggs and place them round the edges and don't forget the little bunnies!

Cupcake Assembly


For the cupcakes, I just piped a small swirl on each and topped with mini eggs and bunnies. Check out the hazelnut cream on the inside!


I really enjoyed baking up a storm with this creative, seasonal, Easter bake. What will you bake up on a budget?


For the little ones or even for a laugh at the office, why not do an Easter egg hunt with Aldi's handy kit. Hide these milk chocolate goodies and get the kids, or big kids, to find them!

Say it with Aldi this Easter.

Love, 

Jess xo


Sunday, 15 February 2015

Eat: Red Velvet Fluffy Pancakes

Hey foodies,


So with lent looming after Pancake Day, are you planning to give up the usual? I could live without alcohol and survive without sweets, but one thing I'd struggle to cope without is CHOCOLATE. I'm toying with the idea of giving it up, so for my last big choctastic blow out, what more could I want than red velvet pancakes, smothered in milk chocolate ganache?! 


A little rich for breakfast, these make the perfect dessert to share. These, pictured above, were demolished by my boyfriend and I on Valentine's Day. I did struggle to finish my pink cava afterwards, so you definitely need to share this tower of chocolatey pancake goodness.


Ingredients

115g Self raising flour
25g Cocoa Powder
2tbsp Golden caster sugar
1tsp Baking powder
2tbsp Melted salted butter
1 Egg, beaten
145ml Milk
1/8tsp red gel food colouring (may need more for deeper colour)

For the Ganache

200g Milk or dark chocolate
150ml Double cream

Additional Toppings

  • Honeycomb
  • Cubed fudge
  • Crushed malteasers
  • Crushed cream egg
  • Marshmallows
  • Chopped hazelnuts

Method

  1. Break the chocolate into pieces and place in a bowl/jug. Heat the cream over a medium heat to boiling and pour over the chocolate. Stir with a spatula until all the chocolate is melted and your a left with a smooth, creamy sauce.
  2. Sift flour, baking power, cocoa powder and caster sugar into a bowl. In a separate bowl/jug whisk together the milk, egg, butter and finally the red food colouring.
  3. Pour the milk mixture into the flour mixture and beat with a fork until you have a smooth batter. It may need a little rapid fork action, to remove all the lumps and don't worry if the mixture looks a little thick.
  4. Heat a non-stick pan over a medium heat, with a little oil or better still fry light. Add a ladle of batter, a second pancake if you think your pan can handle it!
  5. Wait until the top of the pancake begins to bubble slightly and the edges look like they're firming up and then flip over - I use a spatula because I'm a tad too cautious! When both sides are golden and the pancakes looking nice and fluffy, get it out and onto your plate.
  6. Serve immediately; pile the pancake stack high, smother with the chocolate ganache and scatter on any additional toppings you choose. I served mine with milk chocolate ganache, crushed malteasers and homemade smashed up honeycomb. Why not add some whipped double cream for extra luxury?
Keep calm and get your whisk on.

Love Jess xo


Monday, 14 July 2014

Eggcellent Chocolate Filled Clandestine Cake Club

April saw a fantastically full gathering at the Clandestine Easter themed baking event, in Sheffield. It was a chocolate based event, so I obviously had to attend! With Spring fever, I baked a simple chocolate loaf cake and turned the decoration into a carrot garden bed, with rosette piped buttercream, vanilla flowers and bright orange carrots running through the centre of the cake - not forgetting the popping candy mud.


With spare mixture I also rustled up a few mini cupcakes. We held a dissertation hand in house party and the cupcakes went down a treat! Mini mouthful's of happiness!


The rest of the cakes were equally as delicious, including a Sachertorte, marble bundt cake and a few Brooklyn Blackout cakes. I took a big board of tasty treats home for my friends too!


You can see how busy this event was with the sheer number of tasty chocolate treats for us all to try.


Check out my home time cake platter! Chocolate cake never lasts long in my house though!


Keep calm and tuck in.

Love,

Jess xo

Tuesday, 17 June 2014

It's My BIRTHDAY and I'm gonna BAKE!

So this May was my 21st birthday and being a big baker, I had to make my favourite! No two guesses needed that I'm a chocoholic, so check out my three layer sponge with white chocolate ganache filling and dark chocolate ganache coating. Not forgetting the homemade chocolate truffles dusted in bitter cocoa.


It was a huge hit - what do you think? Slices were pretty big! It was nice to have a relaxing bake on my birthday and it turned out pretty smooth too.


Let me know what your perfect birthday cake would be? If you're lucky I may knock up a few tutorials for you cheeky bakers with the best ideas!


Keep calm and cake on!

Love,

Jess xo

Monday, 17 March 2014

Little Baked Beauties...


Hey foodies! Just a short and sweet post with a few of these little beauties I made as a thank you for my website designers. I have a team of fabulous SHU students working their magic on my website design, which is soon to launch, and what better way for a baker to say thanks than with CAKE!


I could not resist a little snap of them coming out the oven. I wish I could put the aroma of fresh red velvet cupcakes online, because the house was full of their warm, homely, sweet, chocolatiness!


 But the cupcakes that got the most attention are these tasty treats below!


These cuties were a simple vanilla sponge base, with vanilla pod frosting and a caramel swirl. 


 I finished the red velvet cupcakes with a little red dusting, elegant, but not quite as dramatic as the caramel.

My website hosting page (Red Velvet Baking) is now live, so keep posted for more to come. In the meantime, dry not to dribble on your keyboard! ;)


 Keep calm and say thanks with cake!

Love,

Jess

xxx


Sunday, 23 February 2014

Have a Heart, Give a Heart...


Evening Foodies,


Hope you are having a great weekend so far! How was Valentines this year? Spend the night having takeaway with friends or did you end up out for a posh meal with your partner? Either way, it is all about the FOOD these days. I mean I am definitely not one to complain, what better way to say it...

For Valentines this year me and George (my partner) went out for a gorgeous Thai, in Sheffield, and I made him a cute cake. There has to be some perks to dating a baker and free, tasty cake MUST be one of them. 

Check it out...


You could easily add a lid to make it look more like a box of chocolates, but I just wanted to keep it simple. I cut out the fondant heart and piped red icing around the chocolates, to give the effect of a box of chocolates. You can cut more of the cake away, to make them look embedded, but for this cake - it was more about having lots of yummy cake to eat! Needless to say he was very happy.

Keep calm and eat your heart out!


Love, 

Jess

xox